I saw some beautiful kite-shaped earrings on the internet. When researching how they were made, I noticed everyone used different methods. Similar to triangular and circular peyote designs, this style combines herringbone stitch (at the corner) with peyote stitch (on the edges). What makes this pattern different is that it uses the odd-count peyote technique.
The easiest method I found in tutorials was starting from the short edge. I tried using the two-needle method to simplify the process and found it significantly faster. Below, I’ve explained this technique with diagrams to help guide you.
Cut a thread twice the length required for the pattern. Thread a needle onto each end and find the middle (In the diagrams, thread ends are shown in different colors to make them easier to follow.)
There are two ways to start the first row: If you plan to hang the earring from the short side, you can start by picking up three beads at once (similar to triangle peyote, leaving one bead for attaching a jump ring). Or, you can pick up two beads and angle them as shown in the diagram. Position the first row at the thread’s midpoint. (No knot is needed, but pass through the beads twice for security.)
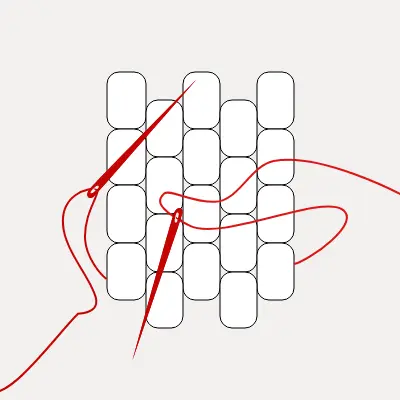
For the second row, use the herringbone stitch: With Needle A, pick up two beads and pass through the next bead. When this row is finished, both thread ends should be pointing in the same direction and be equal in length.
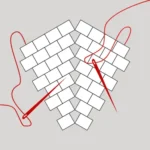
Begin the third row with Needle A, turn as in even-count peyote stitch (Pick up one bead and pass through the last bead of Row 2). At the center, pick up two beads (herringbone stitch) and go to the other side. After adding the final bead, set Needle A aside and switch to Needle B.
To begin the fourth row, pass through the last bead of Row 3 with Needle B (hold the end bead steady with your finger). Add one bead with peyote stitch, two beads with with herringbone stitch in the center, then continue with peyote on the opposite side.
Start the fifth row with even-count peyote, add two beads in the center with herringbone stitch, and continue with peyote. Switch to Needle A after the last bead.
Use the back thread end (needle A) to begin the sixth row, pass it through the last bead of the fifth row, and repeat the same steps
The method is always the same: Begin each row with peyote stitch (adding one bead at a time); in the center, use herringbone stitch (pick up two beads and pass through the next); finish the other side with peyote stitch. At the end of even-numbered rows, do a regular peyote turn, and at the end of odd-numbered rows, simply switch to the other needle and start the next row by passing through the last bead. (This way, you don’t need any extra turns to fix your thread direction.)
I’ve added this peyote technique to the app on the website. In the word chart, I’ve clearly marked where to pick up two beads at once (the herringbone corner), so you can design and apply your own patterns easily with boncuk.app. (If you’re new to the two-needle odd-count peyote method, practice with a flat peyote pattern before weaving the kite shape.)
For online examples, search keywords like kite or arrow earrings—both terms are commonly used for this style.
Below, you’ll find links to the video where I learned this technique, and the post where I explained the flat odd-count peyote technique in detail.
Comments
Thanks for the great tutorial! I appreciate the clear instructions and photos. Best wishes!